The LectroCount XL LED Remote Display ships with a 30-foot, 4-wire, shielded cable that threads through a cord grip at the bottom of the display housing. Also, there is a collection of display labels twist-tied to the display.
 |
INSTALL ACCORDING TO SAFETY CODESThe LectroCount XL LED Remote Display and accessories (whether supplied by Liquid Controls or other) must be installed and operated in accordance with all applicable federal, state, and local construction, electrical, environmental and safety codes. Failure to do so could result in serious injury or death. |
Follow these general steps to install the LectroCount XL LED Remote Display:
1.Check contents of the shipment and ensure that it contains the correct model.
2.Determine which accessories and settings are necessary and include them into your installation.
3.Mount the LectroCount XL LED Remote Display.
4.Wire the LectroCount XL LED Remote Display.
Guidelines
•Read this manual prior to start of installation – If you have any questions, consult with your full-service distributor or call the Service Department at Liquid Controls.
•Avoid excessive vibration or shock – Ensure that the display does not sustain any excessive vibration or shock. Also ensure that the display maintains a secure mount to a platform or supportive member.
•Match LectroCount XL LED Remote Display with the proper device – The four models of the LectroCount XL LED Remote Display are designed for use only with the devices in the list above. No attempt should be made to connect the display to an input other than a compatible device. Model numbers and compatibility are shown on the serial number tag for the display. See Model Number and Device Compatibility in XL LED Remote Display.
•Use Proper Cabling and Wires – The LectroCount XL LED Remote Display comes with a 30-foot, 4-wire shielded cable with 22 gauge wire. The shielded cable should be adequate for most installations. If alternate cabling is necessary, Liquid Controls recommends a 4-wire shielded cable with 22-gauge wire (or larger) and a maximum cable length of 30 feet.
•Secure Cable and Tighten Cover Up on Reassembly – LectroCount XL LED Remote Displays ship ready for final cable termination. If it's necessary to remove the pre-installed shielded cable during installation, be sure to secure the cable and tighten the cover screws in the correct torque pattern so the vapor seal remains intact. See Torque Specifications for more information.
Mounting
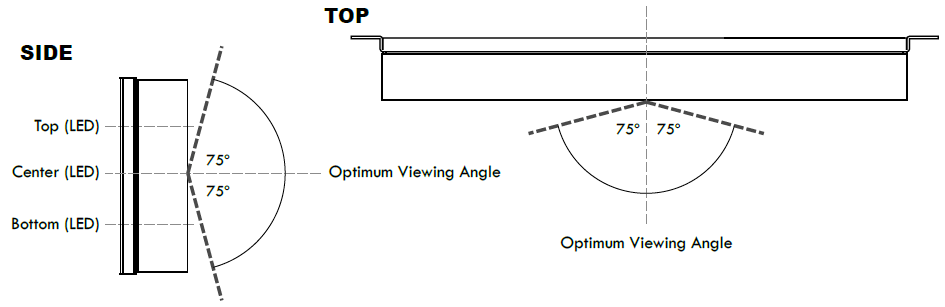
LED displays have an optimum viewing angle. Outside of the optimum viewing angle, displays have an apparent loss of contrast and can be difficult to view. To provide a wide viewing area, a bias has been designed into the LectroCount XL LED Remote Display. The bias creates a optimum viewing angle offset by 75° in either direction from the horizontal and vertical perpendicular. The LectroCount XL LED Remote Display will appear to have the maximum contrast when viewing from within this viewing angle.
BEFORE MOUNTING |
Review the manual and determine the necessary steps for your specific installation. Some XL LED Remote Display accessories and settings require connections and settings inside the display housing. Complete these installations and configurations prior to mounting the display. |
Follow these steps to mount the LectroCount XL LED Remote Display:
1.Select a mounting location where the display is inside the optimum viewing angle at the most common viewing points.
2.Using four ¼" screws, screw the display to a secure location through the four holes in the rear cover of the display.
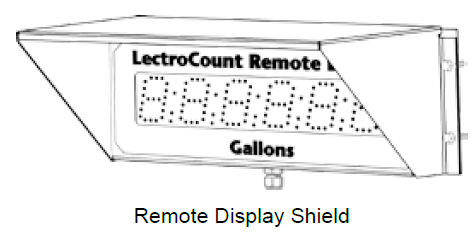
Remote Display Shield Accessory (PN 81879)
In some installations, sun or bright light may produce glare on the display. A Remote Display Shield is available as an accessory to the LectroCount XL LED Remote Display to reduce the effect of glare. |
|
Follow these steps to mount the Remote Display Shield:
1.Slide the shield over the display.
2.Align the four slot-holes in the shield with the four holes in the rear cover of the LectroCount XL LED Remote Display.
3.Using four ¼-inch screws, screw the display and the shield to a secure location through the four holes in the rear cover of the display and the four holes of the display shield.
