Disassembling a Strainer
Follow these steps to disassemble a strainer:
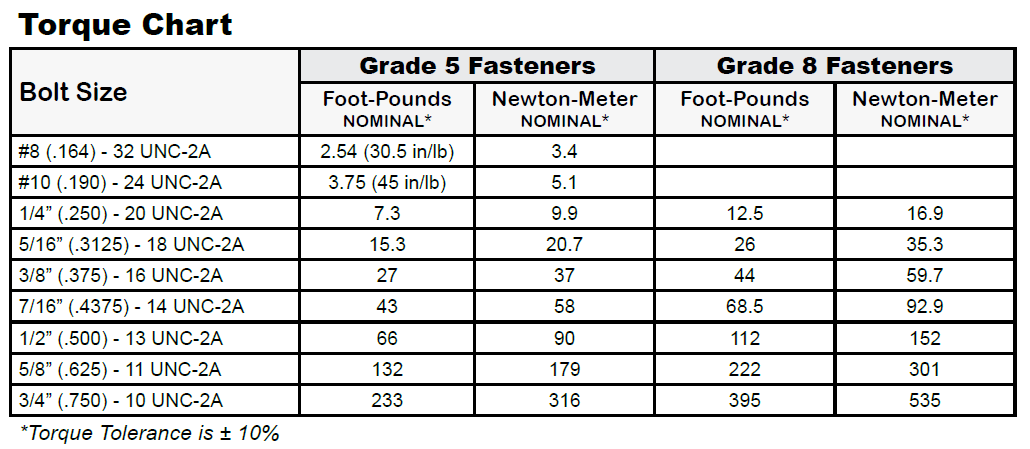
1.Carefully clean strainer basket cover plate to remove all foreign matter, and remove the four bolts and washers from the end cover plate. 2.Remove the end cover plate (cover plate is on the top of FS/FSAA/FSA strainers) and o-ring from the strainer housing. 3.Remove the strainer basket. This may dislodge dirt and particles into the strainer housing. Check inside the strainer housing for any foreign material. Be sure to wipe the housing clean, using a soft cloth. 4.Clean the strainer basket by flushing the basket with a liquid cleaning agent suited for your application. A soft brush may be used to dislodge imbedded particles. If the embedded particles cannot be removed, replace the basket. |
|
NOTE: Never tap the basket ends on a hard surface to dislodge particles. This may dent the basket and make reassembly difficult or cause improper sealing.
5.With a clean, soft cloth, clean the inner face of cover plate, mating face of the strainer body, and seal ring.
6.Make sure the o-rings are cleaned of all dirt and grime. Check the o-rings for damage. If the o-rings cannot be cleaned or are damaged or frayed, replace them.
Replace PTFE O-rings |
Never reuse PTFE O-rings. Always replace them even if they appear to be in good condition. |
Reassembling a Strainer
F/FA Strainer
Follow these steps to disassemble a F/FA strainer:
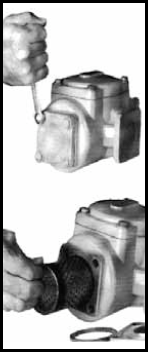
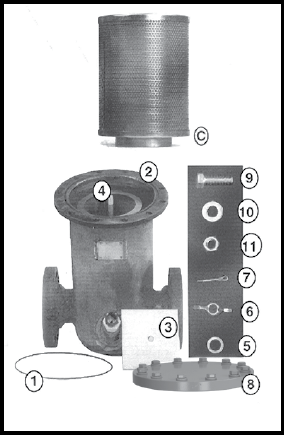
1.Replace the strainer basket (A) or (B) into the housing. 2.Place the end cover o-ring (1) in the groove in the end cover (2). 3.Place the end cover (2) with the o-ring installed, on the strainer housing end (3). 4.Fasten the end cover with the 4 washers and screws (4). Evenly tighten all screws. See the Torque Chart below.
|
 |
Tightening Screws and Nuts |
Leakage that occurs after tightening the fasteners indicates a damaged seal or distortion to the surface of the cover. In either case, the seals or cover must be replaced. Additional tightening will not stop the leakage. |
FS/FSAA/FSA Strainer
Follow these steps to disassemble a FS/FSAA/FSA strainer:
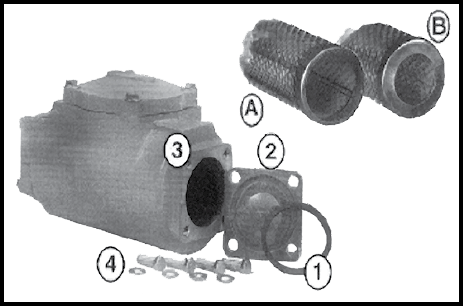
1.Strainer baskets have an extended collar, or lip on the bottom end of the basket (C). Insert this end into the strainer housing first. 2.Place the o-ring (1) in the groove on top of the strainer housing (2). 3.Place the center hole of the basket cover plate (3) over the basket rod (4) that extends from the center of the housing. The plate should now rest on top of the basket. 4.Install the washer (5) and the wing-nut (6) on the basket rod (4). 5.Place the cotter pin (7) through the hole at the top of the basket rod (4). 6.Place the cover (8) on top of the strainer housing. 7.Insert the 12 or 16 screws (9) into the cover holes (8). Attach the flat washer (10) and nuts (11) to the screws (9) from below. Evenly tighten all nuts and screws. See the Torque Chart below. |
 |
 |
WARNINGBefore refilling or re-pressurizing your meter/strainer assembly, all seal gaskets and bolts must be in place and fully tightened to prevent leakage of product out of the system. See Torque Chart below. Failure to follow this procedure may result in a hazardous condition and possible serious injury or death. |